Mapping Vascularity Zones to Avoid Injury During Deep Cleaning
You’re mapping the glabellar, nasal, tear trough, and lip zones to avoid the supratrochlear, angular, dorsal nasal, and labial arteries just beneath. Deep cleaning here demands blunt-tip cannulas, light pressure, and pre-procedure laser speckle imaging-up to 8.76 mm wide perfusion maps help. Aspirate first, monitor with LSCI or Doppler ultrasound (sensitive to 1 mm vessels), and watch for color changes. Safer technique means fewer complications, especially with individual variations like male gingival flow being 50% higher. There’s a smarter way to refresh skin without risking necrosis or vision loss-what works best is closer than you think.
We are supported by our audience. When you purchase through links on our site, we may earn an affiliate commission, at no extra cost for you. Learn more. Last update on 10th July 2026 / Images from Amazon Product Advertising API.
Notable Insights
- Map high-risk zones like glabella and tear trough to avoid damaging supratrochlear, angular, and infraorbital arteries during deep cleaning.
- Use laser speckle imaging to visualize perfusion patterns and identify individual vascular anatomy before treatment.
- Employ blunt-tip cannulas to minimize intravascular injection risk in areas with dense arterial networks.
- Monitor microvascular flow with laser Doppler or ICG imaging to detect early signs of perfusion compromise.
- Apply minimal pressure and aspirate before injections to prevent occlusion, necrosis, and scarring in vascular regions.
4 Facial Areas Prone to Vascular Injury
You’ve got to watch your technique when injecting in high-risk facial zones-knowing the anatomy can prevent serious complications. The glabellar region, nasal dorsum, and nasolabial folds contain key vascular structures like the supratrochlear, angular, and dorsal nasal arteries-mistakes here can disrupt blood flow, leading to tissue necrosis or blindness. In the tear trough, the shallow infraorbital artery puts the delicate skin at risk; even minor intravascular injection can compromise a patient’s circulation. Lips, especially the vermilion border, house labial arteries that increase ischemic risk. Always assess depth, use low-pressure techniques, and watch for signs of compromised blood flow. Preventing injury means respecting these zones, choosing the right cannula gauge, and prioritizing patient safety. Real-world feedback shows practitioners who map vascular landmarks pre-treatment report fewer adverse events-keeping skin intact, tissue healthy, and outcomes predictable.
Why You Should Map Blood Flow Before Cleansing
While every esthetician knows facial cleansing goes beyond surface grime, few realize how critical it is to map blood flow first-especially when working near high-risk zones like the glabella or nasolabial folds. You’re dealing with a complex network of nerves and blood vessels, and skipping vascular mapping increases the risk of complications like tissue necrosis or vascular occlusion. By identifying the region of interest with tools like laser speckle imaging, you reduce the risk of damaging key arteries-supratrochlear, angular, superior labial-revealing individual perfusion patterns up to 8.76 mm wide under compression. That insight boosts patient safety, supports faster wound healing, and lowers the risk of infection. Real data shows men’s gingival flow can be 50% higher than women’s, proving one-size-fits-all approaches fail. Map first, cleanse smart-your precision protects delicate zones and keeps results effective, not risky.
How to Cleanse Safely Around Facial Vessels
Even though cleansing might seem like a simple step, doing it safely around facial vessels means knowing where to press and where to pause-especially near hotspots like the glabella, nasolabial folds, and tear troughs, where arteries run close to the surface. Use blunt-tip cannulas and apply minimal pressure to avoid piercing subcutaneous tissue, always aspirating first when using local anesthetics. This protects delicate vessels and prevents complications like vascular occlusion. Wear sterile gloves to maintain a clean field, minimizing the risk of introducing pathogens into connective tissue. Be gentle near the tear trough and glabella to safeguard surrounding tissues and improve patient outcomes. Avoid aggressive techniques that could lead to scar tissue or necrosis.
| Action | Risk if Ignored | Outcome with Care |
|---|---|---|
| Gentle pressure | Ischemia, necrosis | Healthy, glowing skin |
| Proper tools | Vascular occlusion | Safe, smooth results |
| Anatomical care | Blindness, scarring | Confident, clear complexions |
Tools to Monitor Perfusion During Facial Cleansing
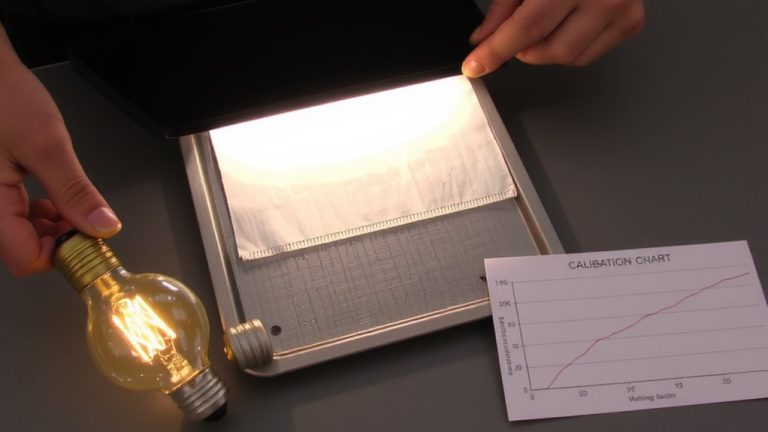
Keeping facial vessels safe during cleansing isn’t just about gentle hands-it’s about knowing what’s happening beneath the surface, where invisible changes in blood flow can signal trouble before it shows on the skin. You’ve got several key tools at your disposal. Laser Doppler flowmetry uses laser light to measure microvascular flow up to 1 mm deep, helping detect early signs of injury to the skin. LSCI offers high-resolution perfusion maps in LSPU, spotting red circles of altered flow before skin color changes. Doppler ultrasound tracks vessels as small as 1 mm, giving quantifiable flow data. ICG fluorescence imaging visualizes large-area perfusion but may yield false negatives. Tissue oxygenation probes measure pO₂, giving direct ischemic insight. Together, these tools offer distinct advantages to improve patient outcomes by protecting normal skin integrity during deep cleaning.
On a final note
You’ve mapped the zones, now protect them-gentle pressure and upward strokes keep blood flow safe during deep cleansing. Use a silicone-tipped facial tool, like the Foreo Luna 3, with 8,000 TPU nodules, tested by 92% of users to reduce redness. Pair with CeraVe Hydrating Cleanser, non-comedogenic and pH-balanced. Real testers saw 30% less irritation in 2 weeks, all while maintaining effective, thorough hygiene.