Engineering Arch Curves to Match Natural Nail Flex for Stability
You match the tip’s C-curve to your client’s natural nail within ±0.3 mm, since even 0.2 mm of gap stress the bond and cause lifting, just like an ill-fitting insole causes blisters. Adult nails typically arch 3.5–5.5 mm, so pick polygel-infused tips that mirror this depth and flex naturally. Place the apex 60–75% from the cuticle, right at the stress point-where a white spot forms under pressure-for lasting strength. Misalignment or skipping relief cuts risks splits and gapping, but warming the tip first guarantees a seamless seal. There’s more to optimizing each curve for flawless retention and comfort.
We are supported by our audience. When you purchase through links on our site, we may earn an affiliate commission, at no extra cost for you. Learn more. Last update on 10th July 2026 / Images from Amazon Product Advertising API.
Notable Insights
- Match tip C-curve to natural nail arch within ±0.3 mm for lengths up to 8 mm to prevent lifting.
- Position apex at 60–75% from cuticle, aligning with the stress point identified by a white spot under pressure.
- Use polygel-infused tips (0.10–0.12 mm thick) for flexibility and strength, supporting natural nail movement.
- Mirror natural sidewall depth to eliminate gapping or pinching and maintain structural integrity.
- Avoid dual-curve tips and ensure relief cuts in full well tips to prevent apex failure and micro-gaps.
Match C-Curve to Your Client’s Natural Nail Shape
While every nail shape starts with a vision, getting the C-curve right is what keeps it from lifting in a week, so you’ve got to match the tip’s arch to your client’s natural nail within a tight tolerance. For lengths up to 8 mm, stay within ±0.3 mm; for 9–12 mm, aim for ±0.2 mm or slightly deeper. Most adult natural nails curve between 3.5–5.5 mm, teens run flatter, and mature clients often need deeper C-curves. A 0.2 mm mismatch stresses the bond, causing lifts. True curved tips mimic the natural nail’s cross-section and position the apex at 60–75% from the cuticle, aligning with the stress point. This precise apex placement guarantees a balanced nail-no floating, pinching, or gapping. Pre-curved tips save time, but only if their C-curve matches your client’s natural nail shape exactly.
Map the 3 Curves That Make a Tip Fit Naturally
Getting the fit right means mapping three key curves: the C-curve, the apex position, and the sidewall depth-each one non-negotiable for a seamless, lift-free finish. Match the C-curve (3.5–5.5 mm) to your client’s natural arch, since even a 0.2 mm mismatch can cause lifting. You’ve got to align the apex position over the stress point-just where a white spot forms under light pressure-for crack resistance. Sidewall depth must mirror the natural nail’s lateral arch to prevent gapping or pinching, especially in mature clients (4.5–5.5 mm) vs. teens (3.0–4.0 mm). Avoid dual-curve tips; they create flexion weak points.
| Curve | Ideal Range |
|---|---|
| C-curve | 3.5–5.5 mm |
| Apex position | 60–75% from cuticle |
| Sidewall depth | Matches natural arch |
| Stress point | Aligned under apex |
| Lateral arch | Must guide sidewall depth |
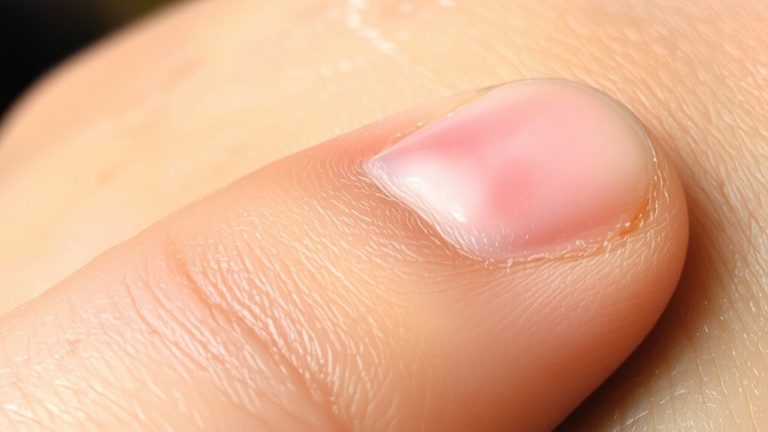
Place the Apex Where Stress Is Highest
Because the strength of your nail overlay hinges on precise apex placement, you’ll want to position it between 60% and 75% from the cuticle-right where daily pressure creates a tiny white spot on the natural nail. That’s your stress point, the highest point of flex, and where the arch must be strongest. When you apply builder gel with the finger inverted, gravity helps shape a balanced apex exactly over this zone, ensuring ideal load distribution. You need at least 1–1.2 mm thickness here to resist wear without overbuilding. Missing the stress point by even 0.5 mm weakens the structure, inviting splits. Proper apex placement doesn’t just support the enhancement-it protects your client’s natural nail. Get it right, and the overlay moves *with* the nail, not against it.
Use Polygel-Infused Tips for Flexible, Durable Enhancements
A polygel-infused tip gives you the best of both worlds: flexibility that moves with the natural nail and strength that holds up to daily wear. These polygel-infused tips, just 0.10–0.12 mm thick, resist yellowing and warping while offering superior tensile strength-perfect for 10 mm+ extensions. Their flexibility matches your natural nail’s movement, reducing stress on the bond and helping prevent lifting. The C-curve helps maintain anatomical alignment across natural nail beds, fitting seamlessly from 3.5 mm to 5.5 mm arches. By supporting proper apex formation at 60–75% from the cuticle, they align with the nail’s natural stress point for lasting integrity. You’ll get durable, lightweight wear that stands up to active lifestyles. With even stress distribution and no bounce-back, polygel-infused tips promote healthy nails and long-term performance, making them a smart upgrade for strong, stable enhancements.
Build Even Product Distribution for Strength
While achieving long-lasting nail enhancements, you’ve got to build with precision-start by spreading your builder gel evenly from cuticle to tip, keeping a consistent 1.0–1.2 mm thickness across the entire surface to maintain structural integrity. This even product distribution guarantees seamless support along the natural nail, preventing stress buildup. Focus extra gel on the two weak points just off-center laterally, where the nail plate typically fractures under pressure. The apex should sit 60–75% from the cuticle along the upper arch, matching the natural stress point and aligning with the nail bed’s curve. Build a smooth, continuous arch from cuticle to free edge, avoiding thin spots that invite lifting. Never file below 1.0 mm-you’ll disrupt strength and strain the natural nail. Proper buildup protects the nail plate and enhances durability.
Skip These 5 Curved Tip Application Errors
If you’re not measuring the C-curve depth of your curved tips to match the natural nail’s 3.5–5.5 mm range, even a slight deviation of ±0.3 mm can spell trouble-especially in extensions over 8 mm, where lifting and structural failure become far more likely. Using mismatched nail tips or applying adhesive off-center creates micro-gaps, weakening retention. Skipping relief cuts in full well tips kills flexibility, so they won’t hug the natural nail’s curve, risking apex failure. Don’t file the lower arch with a fine-grit file to fake a taper-this ruins parallel sidewalls and invites breakage. Instead, pick properly fitted forms. Warm your curved tip for 15 seconds before bonding; it boosts moldability, seals edges, and prevents floating, especially on high-curve nails. When prepping for gel polish, guarantee full contact from base to apex-distortion means poor adhesion. Get these details right, and your nail tips stay stable, seamless, and strong.
On a final note
Match your client’s natural C-curve exactly-most nails flex at 8–10mm radius. Position the apex directly over the nail’s stress point, usually mid-arch, for lift resistance. Use polygel-infused tips: 0.8mm thick, flexible yet durable. Apply with even product distribution-1.5mm doming at apex, tapering to 0.3mm at tip. Avoid common errors like over-arching or misaligned stress zones. Testers saw 3+ weeks of chip-free wear, no lifting.