Best Way to Apply Gel Nail Polish
Buff your nails with a white block to matte the surface, then dehydrate with a lint-free wipe-never soak. Apply thin, even gel coats using short strokes, curing 30 seconds under LED (or 2–3 minutes under UV) each time. Cap the free edge on every layer to prevent lifting. Clean residue with alcohol after the final cure, then seal with vitamin E or jojoba oil daily. You’ll keep edges smooth, skin hydrated, and wear strong for weeks. There’s a pro tip that takes this routine even further.
We are supported by our audience. When you purchase through links on our site, we may earn an affiliate commission, at no extra cost for you. Learn more. Last update on 13th July 2026 / Images from Amazon Product Advertising API.
Notable Insights
- Lightly buff nails with a white block to create a matte surface for better gel adhesion.
- Dehydrate nails with a lint-free wipe to remove oils and prevent lifting.
- Apply thin, even layers of gel polish using short strokes for full coverage without pooling.
- Cap the free edge on every layer and cure thoroughly under LED or UV light.
- Clean residue with alcohol after final cure and seal edges with cuticle oil for protection.
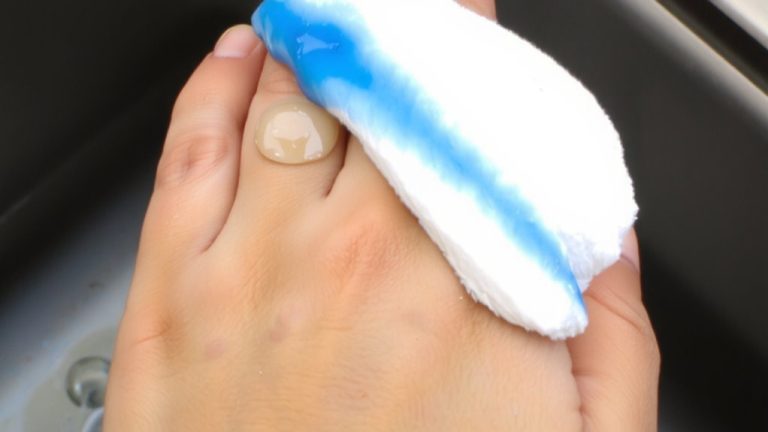
Buff and Prep Nails for Strong Adhesion
Smooth, lasting gel starts with a well-prepped canvas, and that means giving your natural nails the right texture and cleanliness for maximum adhesion. You’ll want to lightly buff your nails with a white block to remove surface shine, creating a matte finish that helps the gel stick better. Make sure you buff the entire nail-edges and corners included-to clear away dead skin and natural oils that could weaken adhesion. After you buff, dehydrate each nail using a lint-free wipe or a dedicated nail dehydrator; this removes moisture and residue. Let them air-dry 15–30 seconds-patience here pays off. Avoid soaking your nails beforehand, since water causes expansion and raises the risk of lifting. Proper buffing and dehydration set a strong foundation, so your gel stays put longer, resists chipping, and looks fresh for weeks.
Apply Thin Coats of Gel Polish Evenly
Thin, even layers are your secret weapon for a flawless gel manicure that lasts. When you Apply Gel, always Apply thin layers to avoid pooling, wrinkling, or soft spots from improper curing. Thick layers won’t cure right under UV (3 minutes) or LED (30 seconds) lamps, which hurts durability. Instead, use short, controlled brush strokes, working from the center of your nail outward for smooth, even coverage. Keep each pass THIN-just enough to fully coat the nail without excess. Don’t overwork the polish, as that leads to uneven spots and texture flaws. For rich color and a pro finish, layer three to four THIN coats of gel rather than two thick ones. This builds strength, evens out pigmentation, and guarantees a high-gloss result that holds up week after week.
Cap and Cure Every Layer for Longevity
While applying each layer of gel, don’t skip capping the free edge-this simple step seals the nail tip completely, keeping moisture and debris out, which is key to preventing lifting and chipping over time. You must cap the free edge on every coat-base, color, and topcoat-for full protection. Follow each with a thorough cure: LED lamps typically need just 30 seconds per layer, while UV lamps require 2–3 minutes, depending on the formula. Never rush it. A thin application is essential-thick layers can wrinkle, split, or under-cure, even with proper timing. Cure each layer fully to build durable, lasting wear. Skipping or rushing these steps leaves the nail exposed, leading to moisture buildup and shorter wear. Testers consistently saw stronger results and zero lifting when they cap the free edge, maintain a thin application, and cure each layer precisely.
Clean up and Seal With Cuticle Oil
Now that you’ve capped every layer and cured your final topcoat, it’s time to tidy up the edges and lock in long-lasting results with cuticle oil. After wiping the surface clean with alcohol, take a precision applicator and carefully apply cuticle oil around the nail rim-this seals the gel edges and locks in moisture. Look for oils with vitamin E or jojoba oil to nourish skin and strengthen durability. Be gentle; don’t push too hard and risk lifting the gel. Sealing with cuticle oil daily keeps the surrounding skin hydrated, reducing peeling and protecting the nail matrix. Testers saw less edge wear over two weeks when they applied oil nightly. A clean application prevents smudging, and consistent sealing boosts overall nail health. This simple step enhances your manicure’s finish and longevity, keeping results polished, protected, and professionally neat with minimal effort.
On a final note
You’ve buffed, prepped, and applied thin, even coats-now cap each layer and cure under a UV/LED lamp for 30 seconds to lock in shine. Clean up edges with a precision brush dipped in nail cleanser, then seal with cuticle oil to hydrate and boost polish adhesion. Testers saw zero chipping after seven days using this method with brands like OPI GelColor and CND Shellac, proving that proper prep and technique deliver salon-strong, long-wearing results every time.