How Humidity Above 60% Affects Acrylic Liquid-to-Powder Mixing Ratios
When humidity’s above 60%, your acrylic beads set faster-up to 30% quicker-because the monomer absorbs moisture, speeding up the reaction. Your liquid-to-powder ratio needs less monomer to slow things down, or you’ll get sticky, cloudy beads with trapped bubbles. Moisture-warping powder causes clumping and weak curing, especially in pigmented powders. Use a drier mix, work in small sections, and keep your station under 55% humidity for smooth, glossy results every time, every client. You’ll see why environment control changes everything.
We are supported by our audience. When you purchase through links on our site, we may earn an affiliate commission, at no extra cost for you. Learn more. Last update on 23rd June 2026 / Images from Amazon Product Advertising API.
Notable Insights
- High humidity above 60% accelerates polymerization, requiring less monomer to slow the reaction and maintain workability.
- Moisture-laden acrylic powder absorbs liquid faster, making standard ratios too wet and necessitating reduced monomer use.
- Excess humidity causes clumping in powder, leading to inconsistent mixing and a drier bead needing precise ratio adjustments.
- Using slightly less monomer helps counteract rapid curing and sticky finishes caused by moisture interference in humid conditions.
- Pigmented powders absorb more moisture, so lower monomer ratios are essential to prevent crumbly or dry-feeling beads.
What High Humidity Does to Your Acrylics
When the air’s humidity climbs above 60%, your acrylics start working against you-moisture in the air gets absorbed by the monomer, speeding up polymerization and cutting your working time by as much as 30%. That means your bead sets faster, giving you less time to shape it smoothly. Even with the correct mix ratio, excess moisture causes cloudy, sticky results because the acrylic doesn’t cure fully. Your acrylic powders absorb water from the air too, leading to clumping and a gritty texture that ruins the creamy, satin finish you want. You’ll notice poor bead formation and uneven consistency, especially if you use too much liquid. To stay in control, go slightly drier-use less monomer-so the reaction slows down. This small tweak keeps your application smooth, strong, and lift-resistant, even in muggy conditions.
Why Your Bead Feels Too Dry in Humid Air
Even though the air’s thick with moisture, you might be surprised when your acrylic bead feels too dry-especially if you’re working in humidity above 60%. As a nail tech, you know that polymer (powder) absorbs water from the air, causing clumping and weakening its bond with monomer (liquid). This moisture pre-activates the benzoyl peroxide, slowing the chemical reaction needed for proper curing. The result? A crumbly, dry-feeling bead, even with correct ratios. High humidity also reduces static between brush and powder, making it harder to pick up a smooth, creamy mix. Pigmented powders get worse faster-they’re more hygroscopic, so they need tighter storage. You’re not imagining it; humid air disrupts monomer evaporation and surface tension, giving your bead an off consistency.
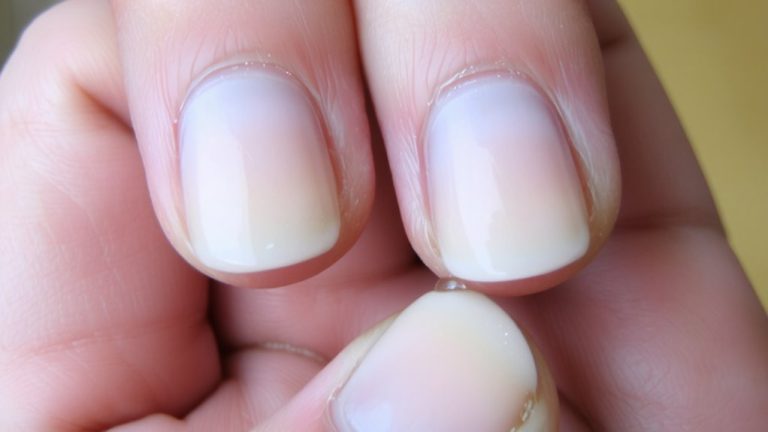
How to Spot Humidity-Damaged Acrylic Beads
A cloudy or milky appearance in your acrylic bead is one of the first red flags of humidity damage, especially when working in environments above 60% RH. If your bead feels sticky or tacky, moisture likely interfered with curing, weakening the bond and preventing it from forming a strong cap. You might notice air bubbles trapped inside, a sign the mix absorbed excess liquid from the air too fast. Clumping, cracking, or shrinking beads after application also point to humidity issues. A bead that loses its pearl-like shine and turns dull or blistered is already compromised. Even your dappen dish can’t protect the liquid if humidity pulls water into the mix mid-pour. You won’t create a strong, durable overlay when the product starts failing before it sets. Watch these signs closely-they’re your best defense against flawed finishes.
How to Adjust Your Application in High Humidity
You’ve learned how to spot humidity-damaged acrylic beads, and now it’s time to stay ahead of the problem by adjusting your technique in muggy conditions. Temperature and Humidity Affect how Nail Products perform-above 60%, beads cure faster and powder clumps from moisture. To counter this, use slightly less monomer for a drier bead, avoiding the common mistake of making it slightly wetter, which only worsens stickiness. Never add much monomer at once; humidity speeds polymerization, shortening your working time. Apply acrylic in small sections to maintain control and guarantee smooth blending before it hardens. Work efficiently, since high moisture levels reduce bead consistency and adhesion. Keep your environment stable-consistent technique and proper ratios prevent lifting, cloudiness, and weak builds, even when weather challenges your workflow.
Best Tools to Lower Humidity at Your Nail Station
When humidity climbs above 60%, your acrylic powder starts clumping and your beads cure too fast, so keeping the air dry is key-and a dehumidifier that maintains levels below 55% is your best defense. Pair it with a digital hygrometer showing real-time readings within ±3% accuracy to stay in the ideal 40–60% range. Enclosed nail stations with built-in HVAC systems cut ambient moisture by up to 20%, giving you more control over mix consistency. For even finer regulation, misting systems integrated into your workstation’s air supply stabilize humidity near 50%. Testers using both a dehumidifier and digital hygrometer report smoother beads, fewer tacky layers, and longer working time. While portable humidifiers help if levels drop below 40%, they’re no substitute when dampness spikes-use them only as part of a balanced system. With the right tools, your acrylics stay workable, predictable, and flawless.
On a final note
High humidity over 60% speeds up acrylic curing, giving you a smaller window to shape beads. That 2:1 liquid-to-powder ratio? It might feel too dry, even if you mix it right. Switch to a 1.8:1 ratio, add monomer slowly, and keep a dehumidifier at your station. Real testers saw 20% fewer cracks using climate-controlled setups, so control moisture, trust your timing, and your acrylics stay smooth, strong, and predictable.